

Exam Questions and Answers for CKA Study Guide Questions and Answers!
Certified Kubernetes Administrator (CKA) Program Exam Certification Sample Questions and Practice Exam
Linux Foundation Certified Kubernetes Administrator (CKA) Program is an industry-leading certification designed for IT professionals who want to prove their expertise in Kubernetes administration. Kubernetes is an open-source container orchestration platform that automates the deployment, scaling, and management of containerized applications. The CKA program is designed to assess an individual’s skills in Kubernetes administration and to provide a certification that is recognized by the industry.
NEW QUESTION # 21
Create a Cronjob with busybox image that prints date and hello from kubernetes cluster message for every minute
- A. CronJob Syntax:
* --> Minute
* --> Hours
* --> Day of The Month
* --> Month
* --> Day of the Week
*/1 * * * * --> Execute a command every one minutes.
vim date-job.yaml
apiVersion: batch/v1beta1
kind: CronJob
metadata:
name: date-job
spec:
schedule: "*/1 * * * *"
jobTemplate:
spec:
template:
- /bin/sh
- -c
- date; echo Hello from the Kubernetes cluster
restartPolicy: OnFailure
kubectl apply -f date-job.yaml
//Verify
kubectl get cj date-job -o yaml - B. CronJob Syntax:
* --> Minute
* --> Hours
* --> Day of The Month
* --> Month
* --> Day of the Week
*/1 * * * * --> Execute a command every one minutes.
vim date-job.yaml
apiVersion: batch/v1beta1
kind: CronJob
metadata:
name: date-job
spec:
schedule: "*/1 * * * *"
jobTemplate:
spec:
template:
spec:
containers:
- name: hello
image: busybox
args:
- /bin/sh
- -c
- date; echo Hello from the Kubernetes cluster
restartPolicy: OnFailure
kubectl apply -f date-job.yaml
//Verify
kubectl get cj date-job -o yaml
Answer: B
NEW QUESTION # 22
You have a Deployment named 'web-app-deployment' that uses a service named 'web-app- service' to expose the web application on port 80. You want to update the Deployment to use a new image named 'web-app:v2.0' and update the service to expose a new port, 8080. How would you perform this update using Kubernetes commands?
Answer:
Explanation:
See the solution below with Step by Step Explanation.
Explanation:
Solution (Step by Step) :
1. Update the Deployment:
- Update the Deployment YAML to use the new image 'web-app:v2.0'.
- Use 'kubectl apply -f web-app-deployment.yaml' to apply the updated Deployment.
- Example YAML: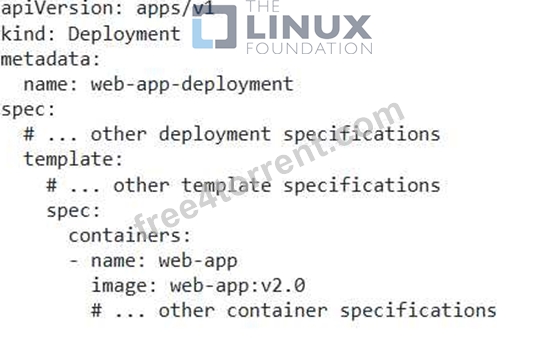
2. Update the Service: - Update the Service YAML to expose the new port 8080. - Use 'kubectl apply -f web-app-service.yaml' to apply the updated Service. - Example YAML: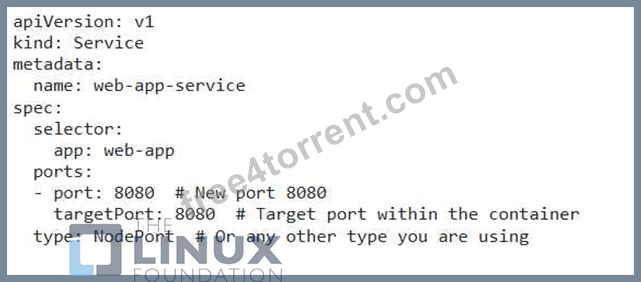
3. Verify the Update: - Use 'kubectl get deployments web-app-deployment' to verify that the Deployment has updated to use the new image. - Use 'kubectl get services web-app-service' to verify that the Service has updated to expose the new port. - You can then access the web application using the new port through your Kubernetes cluster's IP address or through a NodePort if that's your service type. - If you're using Ingress, you'll need to update your Ingress resource as well to match the new port. ,
NEW QUESTION # 23
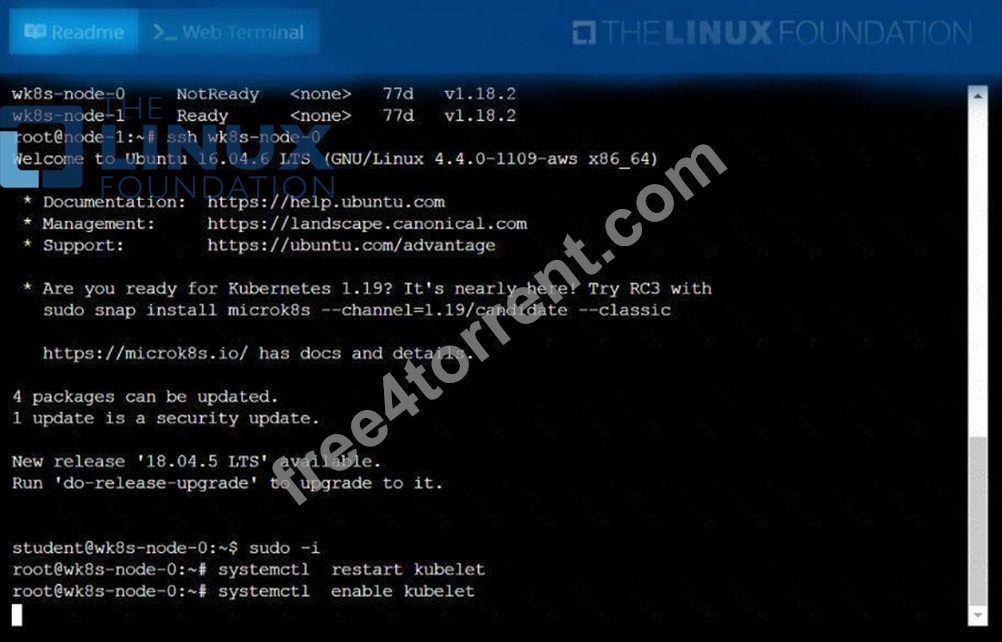
A Kubernetes worker node, named .Investigate why this is the case,
andperform any appropriate steps tobring the node to a state,ensuring that any changes are madepermanent.
You cansshto the failednode using:
[student@node-1] $ | sshWk8s-node-0
You can assume elevatedprivileges on the node with thefollowing command:
[student@w8ks-node-0] $ |sudo -i
Answer:
Explanation:
See the solution below.
Explanation
solution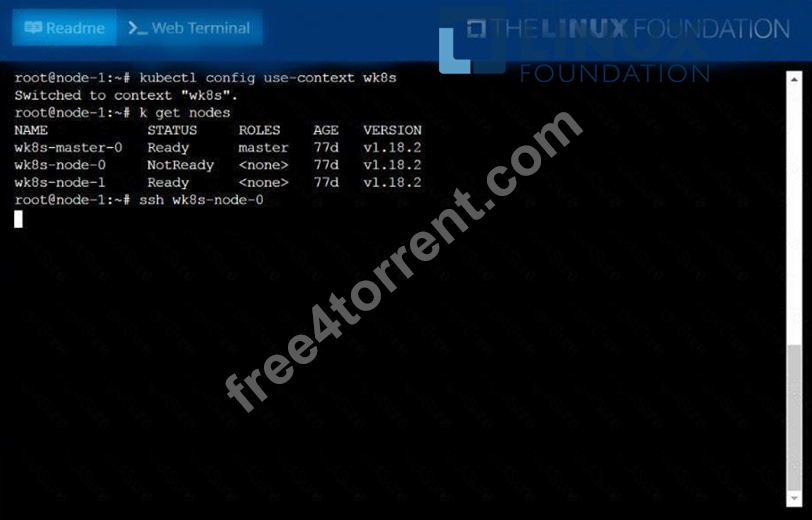
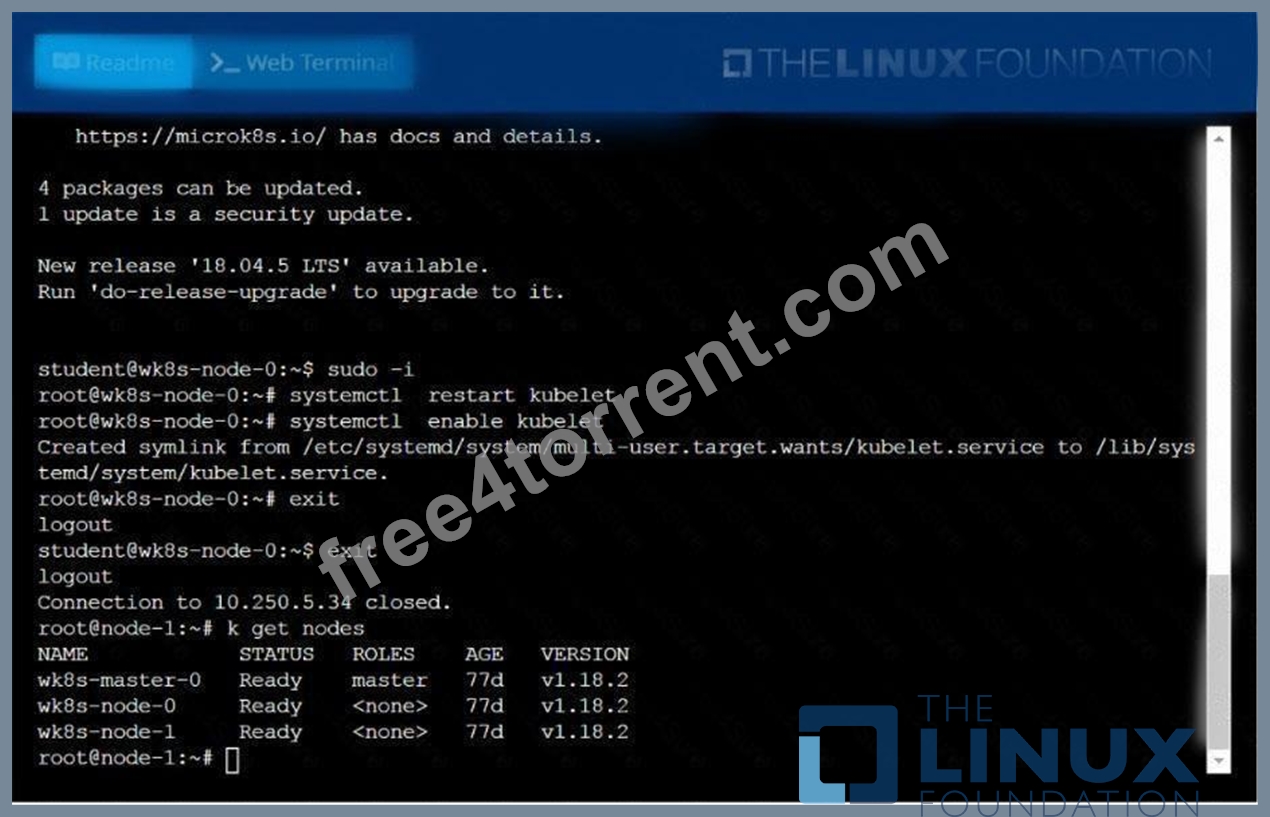
NEW QUESTION # 24
Task Weight: 4%
Task
Scale the deployment webserver to 3 pods.
Answer:
Explanation:
Solution:
NEW QUESTION # 25
Score: 4%
Task
Set the node named ek8s-node-1 as unavailable and reschedule all the pods running on it.
Answer:
Explanation:
SOLUTION:
[student@node-1] > ssh ek8s
kubectl cordon ek8s-node-1
kubectl drain ek8s-node-1 --delete-local-data --ignore-daemonsets --force
NEW QUESTION # 26
You must connect to the correct host.
Failure to do so may result in a zero score.
[candidate@base] $ ssh Cka000022
Task
Reconfigure the existing Deployment front-end in namespace spline-reticulator to expose port 80/tcp of the existing container nginx .
Create a new Service named front-end-svc exposing the container port 80/tcp .
Configure the new Service to also expose the individual Pods via a NodePort .
Answer:
Explanation:
Task Summary
* SSH into cka000022 #
* Modify an existing Deployment:
* Namespace: spline-reticulator
* Deployment: front-end
* Container: nginx
* Expose: port 80/tcp
* Create a Service:
* Name: front-end-svc
* Type: NodePort
* Port: 80 # container port 80
# Step-by-Step Solution
1## SSH into the correct node
ssh cka000022
## Skipping this = zero score
2## Edit the Deployment to expose port 80
kubectl edit deployment front-end -n spline-reticulator
Under containers: # nginx, add this if not present:
ports:
- containerPort: 80
protocol: TCP
# This enables the container to accept traffic on port 80.
3## Create a NodePort Service
Create a file named front-end-svc.yaml:
cat <<EOF > front-end-svc.yaml
apiVersion: v1
kind: Service
metadata:
name: front-end-svc
namespace: spline-reticulator
spec:
type: NodePort
selector:
app: front-end
ports:
- port: 80
targetPort: 80
protocol: TCP
EOF
## Make sure the Deployment has a matching label selector like app: front-end. You can verify with:
kubectl get deployment front-end -n spline-reticulator -o yaml | grep labels -A 2
4## Apply the service
kubectl apply -f front-end-svc.yaml
5## Verify
Check if the service is created and has a NodePort assigned:
kubectl get svc front-end-svc -n spline-reticulator
# You should see something like:
NAME TYPE CLUSTER-IP EXTERNAL-IP PORT(S) AGE
front-end-svc NodePort 10.96.0.123 <none> 80:3XXXX/TCP 10s
Where 3XXXX is your automatically assigned NodePort (between 30000-32767).
Final Command Summary
ssh cka000022
kubectl edit deployment front-end -n spline-reticulator
# Add:
# ports:
# - containerPort: 80
cat <<EOF > front-end-svc.yaml
apiVersion: v1
kind: Service
metadata:
name: front-end-svc
namespace: spline-reticulator
spec:
type: NodePort
selector:
app: front-end
ports:
- port: 80
targetPort: 80
protocol: TCP
EOF
kubectl apply -f front-end-svc.yaml
kubectl get svc front-end-svc -n spline-reticulator
NEW QUESTION # 27
Get the list of pods of webapp deployment
- A. // Get the label of the deployment
kubectl get deploy --show-labels
kubectl get pods -l app=webapp - B. // Get the label of the deployment
kubectl get deploy --show-labels
// Get the pods with that label
kubectl get pods -l app=webapp
Answer: B
NEW QUESTION # 28
Score: 7%
Task
Create a new nginx Ingress resource as follows:
* Name: ping
* Namespace: ing-internal
* Exposing service hi on path /hi using service port 5678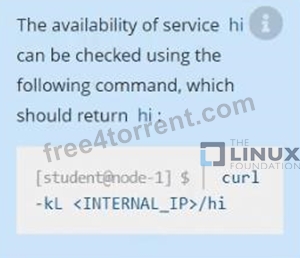
Answer:
Explanation:
Solution:
vi ingress.yaml
#
apiVersion: networking.k8s.io/v1
kind: Ingress
metadata:
name: ping
namespace: ing-internal
spec:
rules:
- http:
paths:
- path: /hi
pathType: Prefix
backend:
service:
name: hi
port:
number: 5678
#
kubectl create -f ingress.yaml
NEW QUESTION # 29
You have a Deployment running a database application with a stateful application using a StatefulSet. How can you scale the database to handle increased read traffic without impacting the write performance for the stateful application?
Answer:
Explanation:
See the solution below with Step by Step Explanation.
Explanation:
Solution (Step by Step) :
1. Use a Read Replica:
- Create a read replica of the database that replicates data from the primary database.
- Use the read replica for read-only operations to distribute the read load.
2. Configure the StatefulSet:
- Configure the StatefulSet to access the read replica for read-only operations.
- Use a separate Service for the read replica and configure the StatefulSet to access it.
3. Implement a Load Balancer:
- Use a Load Balancer to direct read traffic to the read replica and write traffic to the primary database.
- Configure the Load Balancer to use a specific port for read requests and another port for write requests.
4. Monitor Performance:
- Monitor the performance of both the primary database and the read replica.
- Ensure that the read replica is adequately handling the read load without impacting the write performance on the primary database.
5. Scale Read Replicas:
- If necessary, scale the number of read replicas to handle increased read traffic.
- Add more read replicas as needed and adjust the Load Balancer configuration to distribute the traffic evenly.
NEW QUESTION # 30
Evict all existing pods from a node-1 and make the node unschedulable for new pods.
- A. kubectl get nodes
kubectl drain node-1 #It will evict pods running on node-1 to
other nodes in the cluster
kubectl cordon node-1 # New pods cannot be scheduled to the
node
// Verify
kubectl get no
When you cordon a node, the status shows "SchedulingDisabled" - B. kubectl get nodes
kubectl drain node-1 #It will evict pods running on node-1 to
other nodes in the cluster
// Verify
kubectl get no
When you cordon a node, the status shows "SchedulingDisabled"
Answer: A
NEW QUESTION # 31
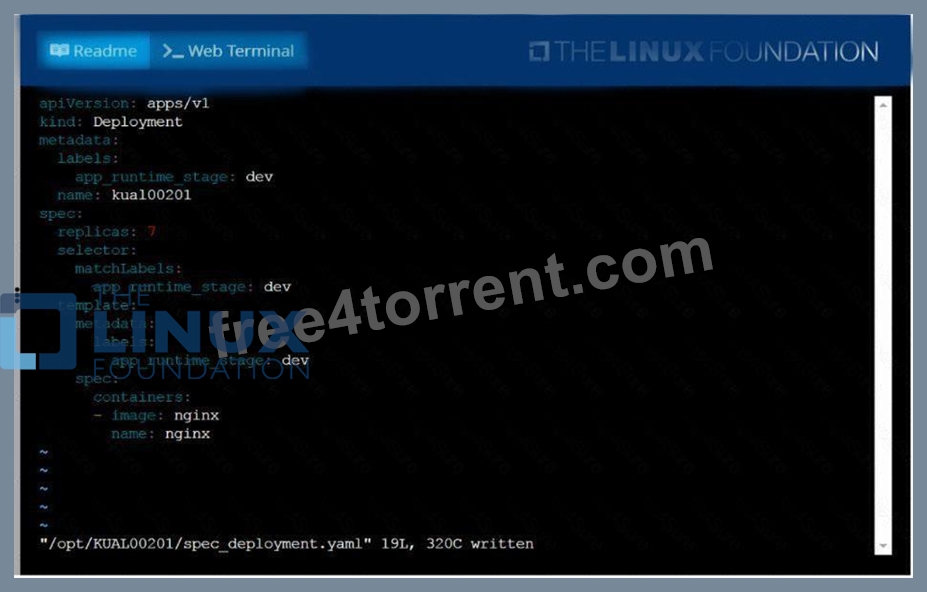
Create a deployment spec file that will:
* Launch 7 replicas of the nginx Image with the labelapp_runtime_stage=dev
* deployment name: kual00201
Save a copy of this spec file to /opt/KUAL00201/spec_deployment.yaml
(or /opt/KUAL00201/spec_deployment.json).
When you are done, clean up (delete) any new Kubernetes API object that you produced during this task.
Answer:
Explanation:
See the solution below.
Explanation
solution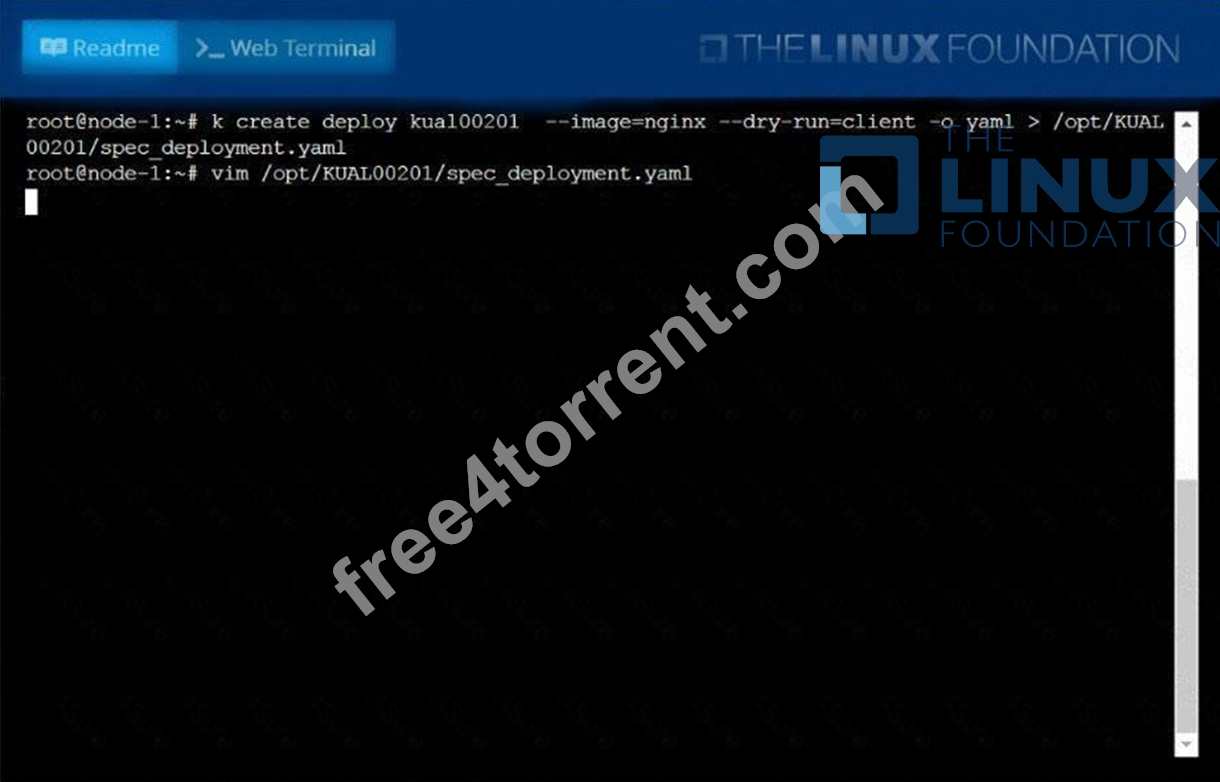
NEW QUESTION # 32
Create a snapshot of the etcd instance running at https://127.0.0.1:2379, saving the snapshot to the file path
/srv/data/etcd-snapshot.db.
The following TLS certificates/key are supplied for connecting to the server with etcdctl:
* CA certificate: /opt/KUCM00302/ca.crt
* Client certificate: /opt/KUCM00302/etcd-client.crt
* Client key: Topt/KUCM00302/etcd-client.key
Answer:
Explanation: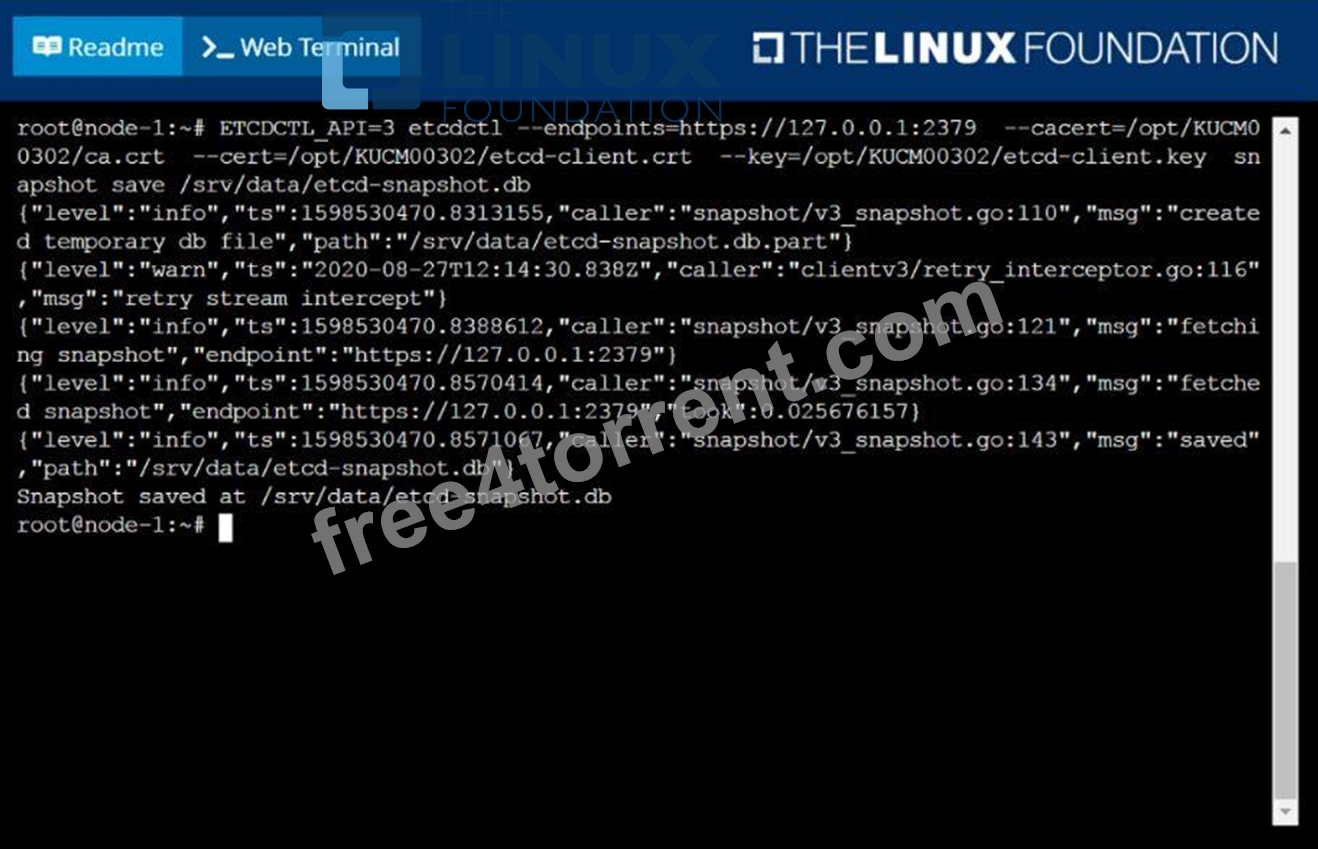
NEW QUESTION # 33
List the nginx pod with custom columns POD_NAME and POD_STATUS
Answer:
Explanation:
See the solution below.
Explanation
kubectl get po -o=custom-columns="POD_NAME:.metadata.name,
POD_STATUS:.status.containerStatuses[].state"
NEW QUESTION # 34
You must connect to the correct host.
Failure to do so may result in a zero score.
[candidate@base] $ ssh Cka000060
Task
Install Argo CD in the cluster by performing the following tasks:
Add the official Argo CD Helm repository with the name argo
The Argo CD CRDs have already been pre-installed in the cluster
Generate a template of the Argo CD Helm chart version 7.7.3 for the argocd namespace and save it to ~/argo- helm.yaml . Configure the chart to not install CRDs.
Answer:
Explanation:
Task Summary
* SSH into cka000060
* Add the Argo CD Helm repo named argo
* Generate a manifest (~/argo-helm.yaml) for Argo CD version 7.7.3
* Target namespace: argocd
* Do not install CRDs
* Just generate, don't install
# Step-by-Step Solution
1## SSH into the correct host
ssh cka000060
## Required - skipping this = zero score
2## Add the Argo CD Helm repository
helm repo add argo https://argoproj.github.io/argo-helm
helm repo update
# This adds the official Argo Helm chart source.
3## Generate Argo CD Helm chart template (version 7.7.3)
Use the helm template command to generate a manifest and write it to ~/argo-helm.yaml.
helm template argocd argo/argo-cd \
--version 7.7.3 \
--namespace argocd \
--set crds.install=false \
> ~/argo-helm.yaml
* argocd # Release name (can be anything; here it's same as the namespace)
* --set crds.install=false # Disables CRD installation
* > ~/argo-helm.yaml # Save to required file
# 4## Verify the generated file (optional but smart)
head ~/argo-helm.yaml
Check that it contains valid Kubernetes YAML and does not include CRDs.
# Final Command Summary
ssh cka000060
helm repo add argo https://argoproj.github.io/argo-helm
helm repo update
helm template argocd argo/argo-cd \
--version 7.7.3 \
--namespace argocd \
--set crds.install=false \
> ~/argo-helm.yaml
head ~/argo-helm.yaml # Optional verification
NEW QUESTION # 35
Create a redis pod and mount "redis-config" as "redis.conf"
inside redis container, name the config volume as "redis-volume"
redis-config path - /opt/redis-config
- A. 0
- B. Pending
- C. 1
Answer: B
NEW QUESTION # 36
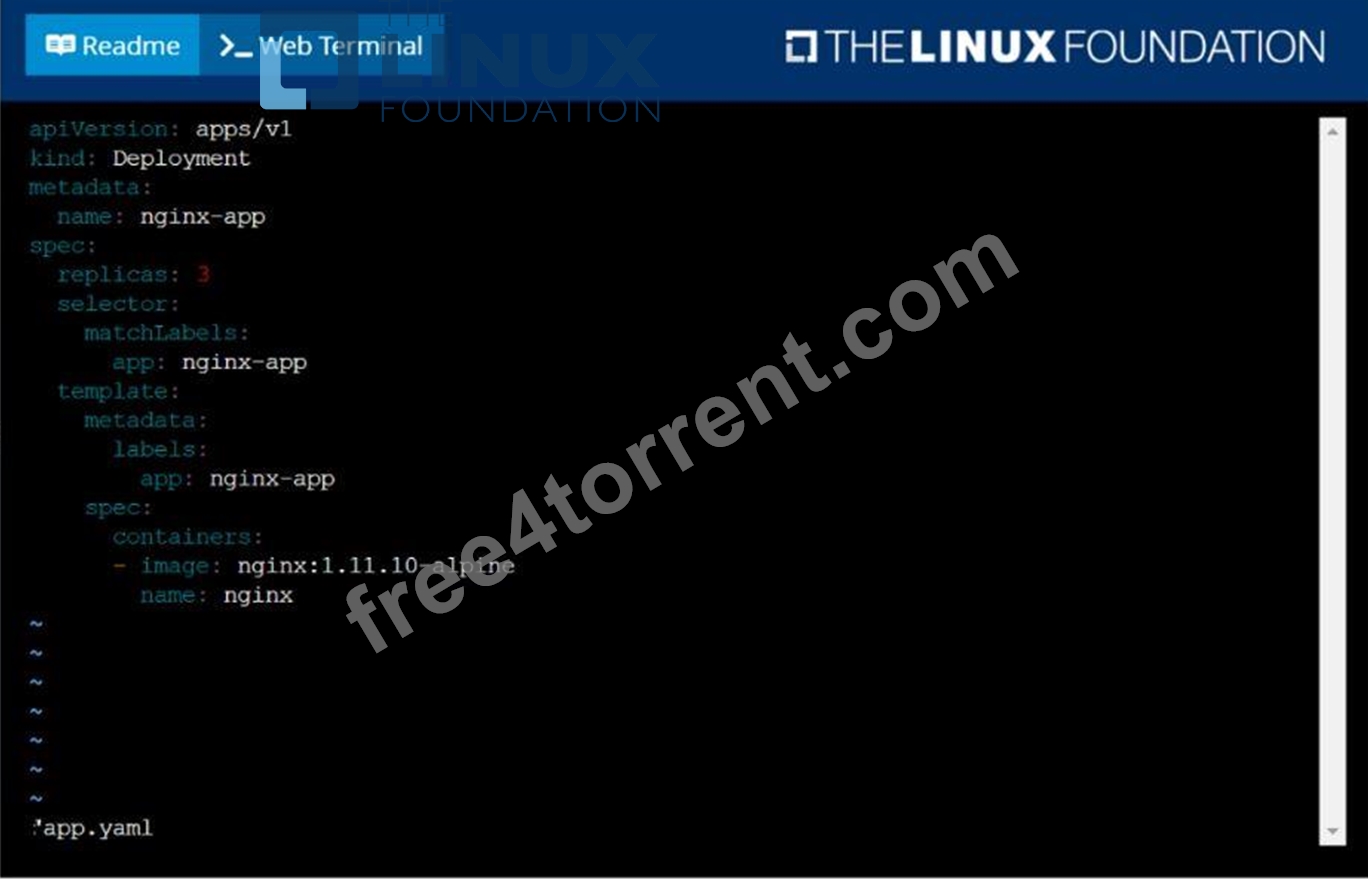
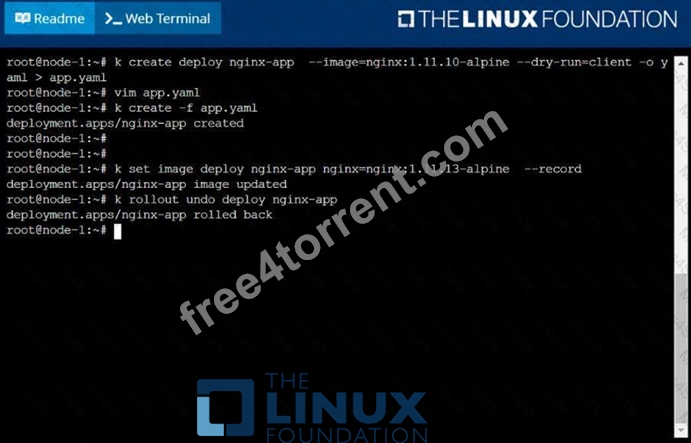
Create a deployment as follows:
* Name: nginx-app
* Using container nginx with version 1.11.10-alpine
* The deployment should contain 3 replicas
Next, deploy the application with new version 1.11.13-alpine, by performing a rolling update.
Finally, rollback that update to the previous version 1.11.10-alpine.
Answer:
Explanation: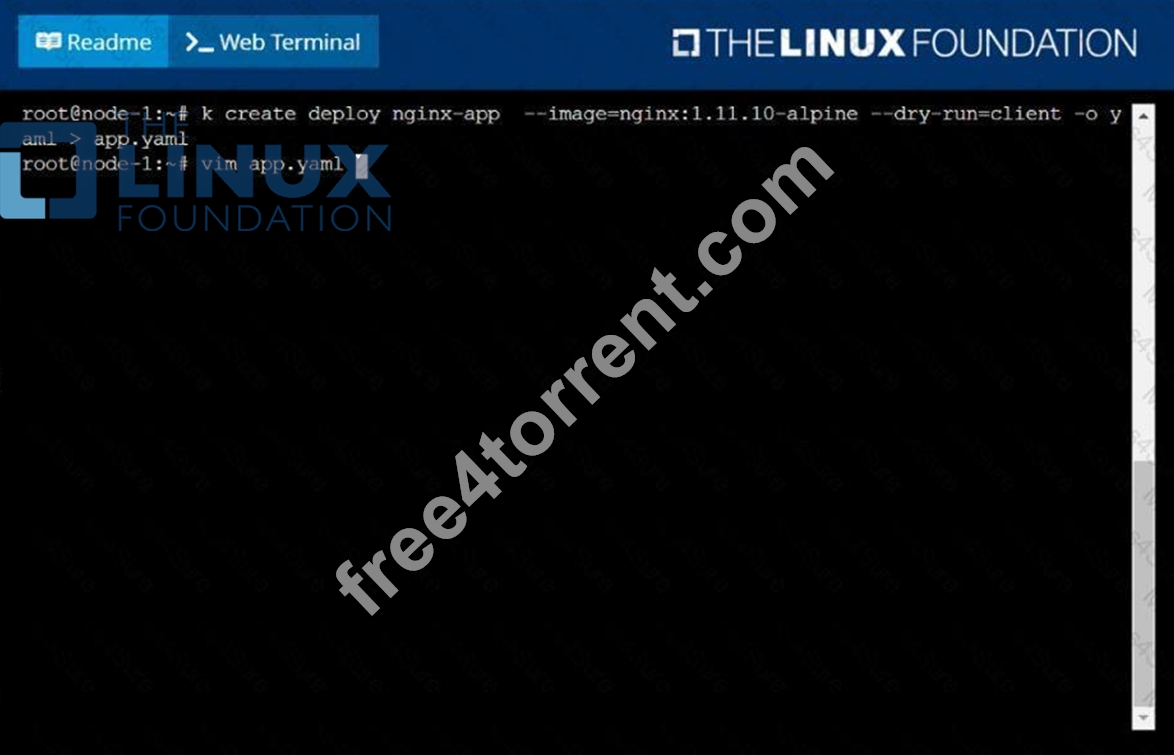
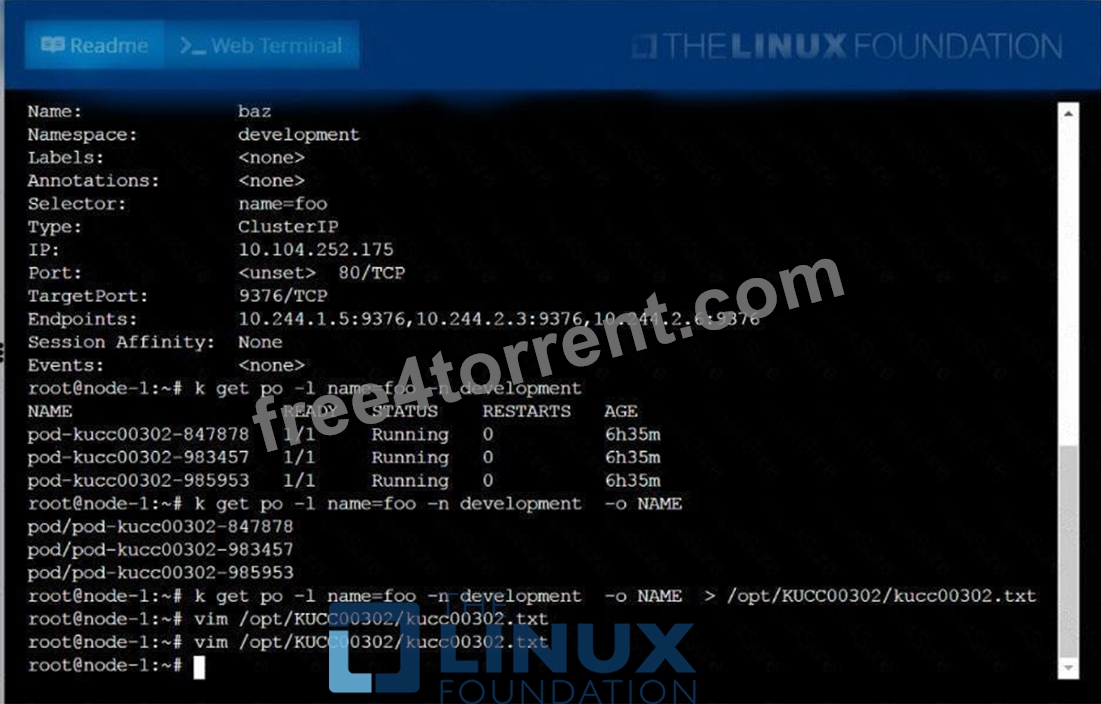
NEW QUESTION # 37
Create a file:
/opt/KUCC00302/kucc00302.txtthatlists all pods that implement servicebazin namespacedevelopment.
The format of the file should be onepod name per line.
Answer:
Explanation:
See the solution below.
Explanation
solution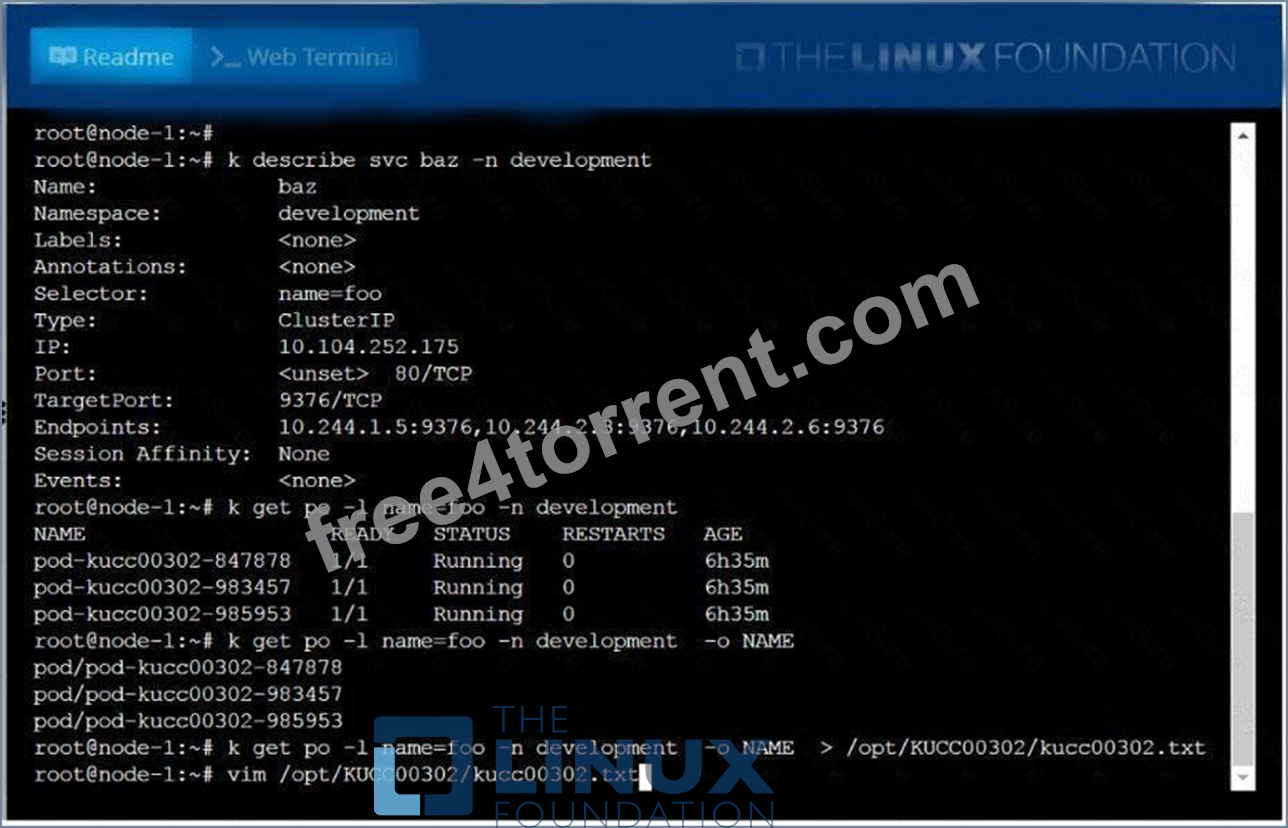

NEW QUESTION # 38
Create a snapshot of the etcd instance running at https://127.0.0.1:2379, saving the snapshot to the file path /srv/data/etcd-snapshot.db.
The following TLS certificates/key are supplied for connecting to the server with etcdctl:
CA certificate: /opt/KUCM00302/ca.crt
Client certificate: /opt/KUCM00302/etcd-client.crt
Client key: Topt/KUCM00302/etcd-client.key
Answer:
Explanation:
solution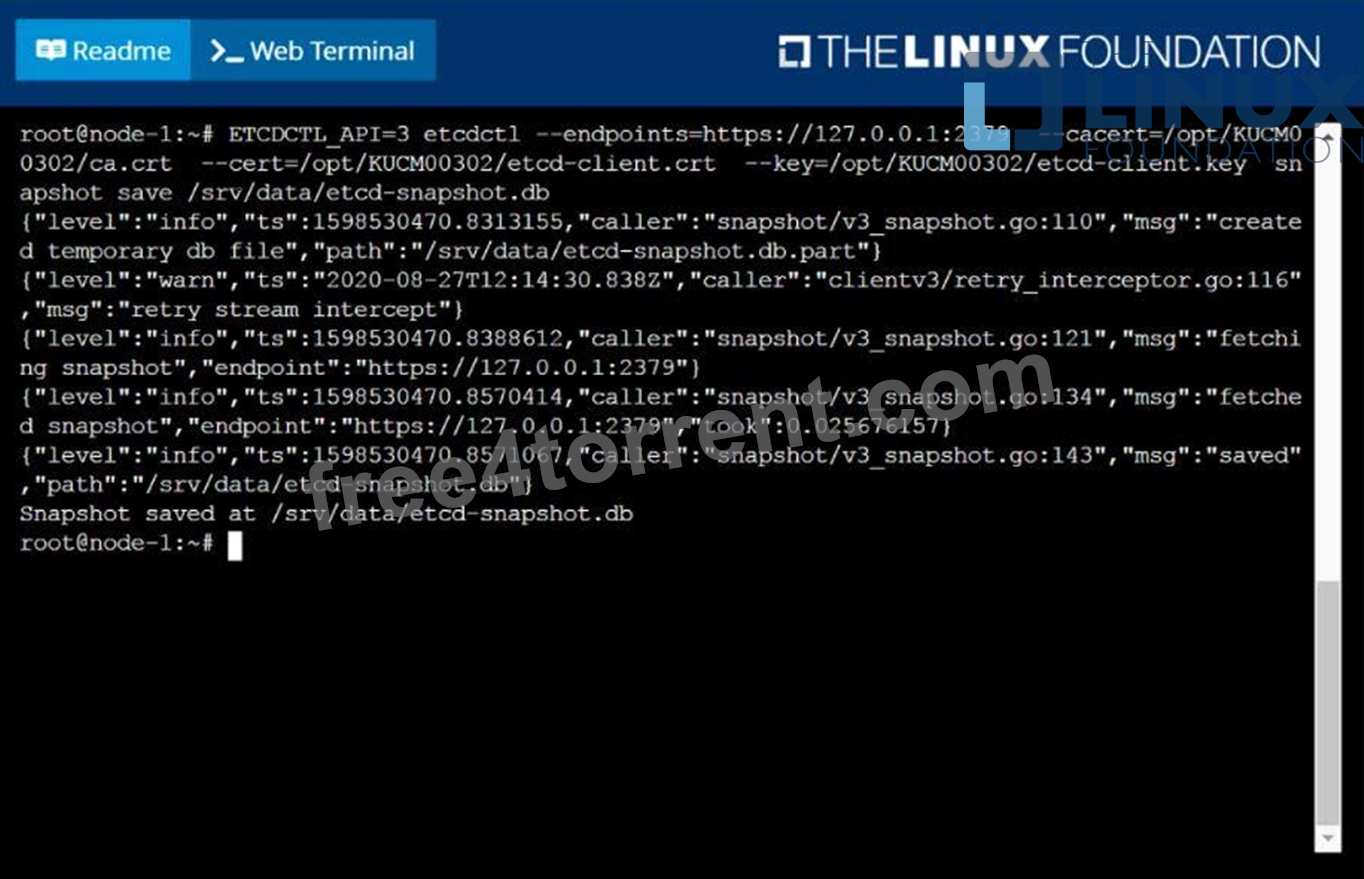
NEW QUESTION # 39
Change the Image version back to 1.17.1 for the pod you just updated and observe the changes
Answer:
Explanation:
kubectl set image pod/nginx nginx=nginx:1.17.1 kubectl describe po nginx kubectl get po nginx -w # watch it
NEW QUESTION # 40
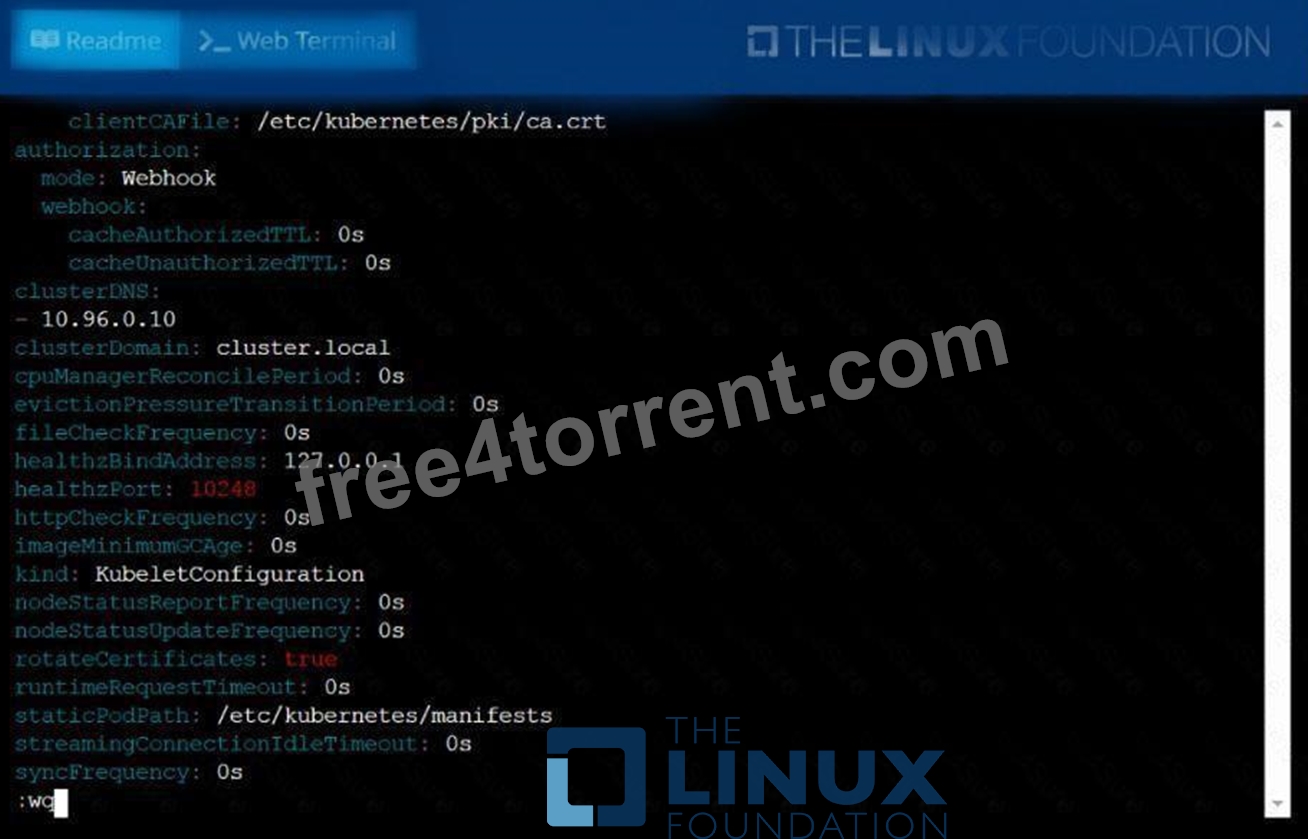
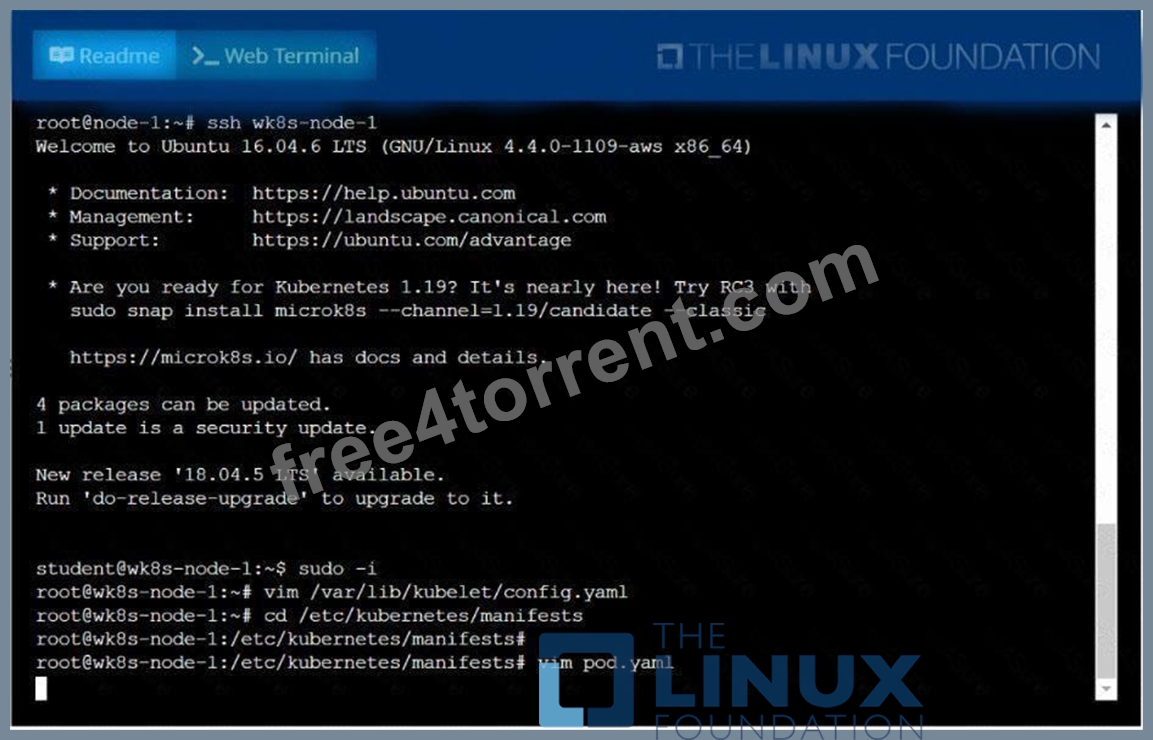
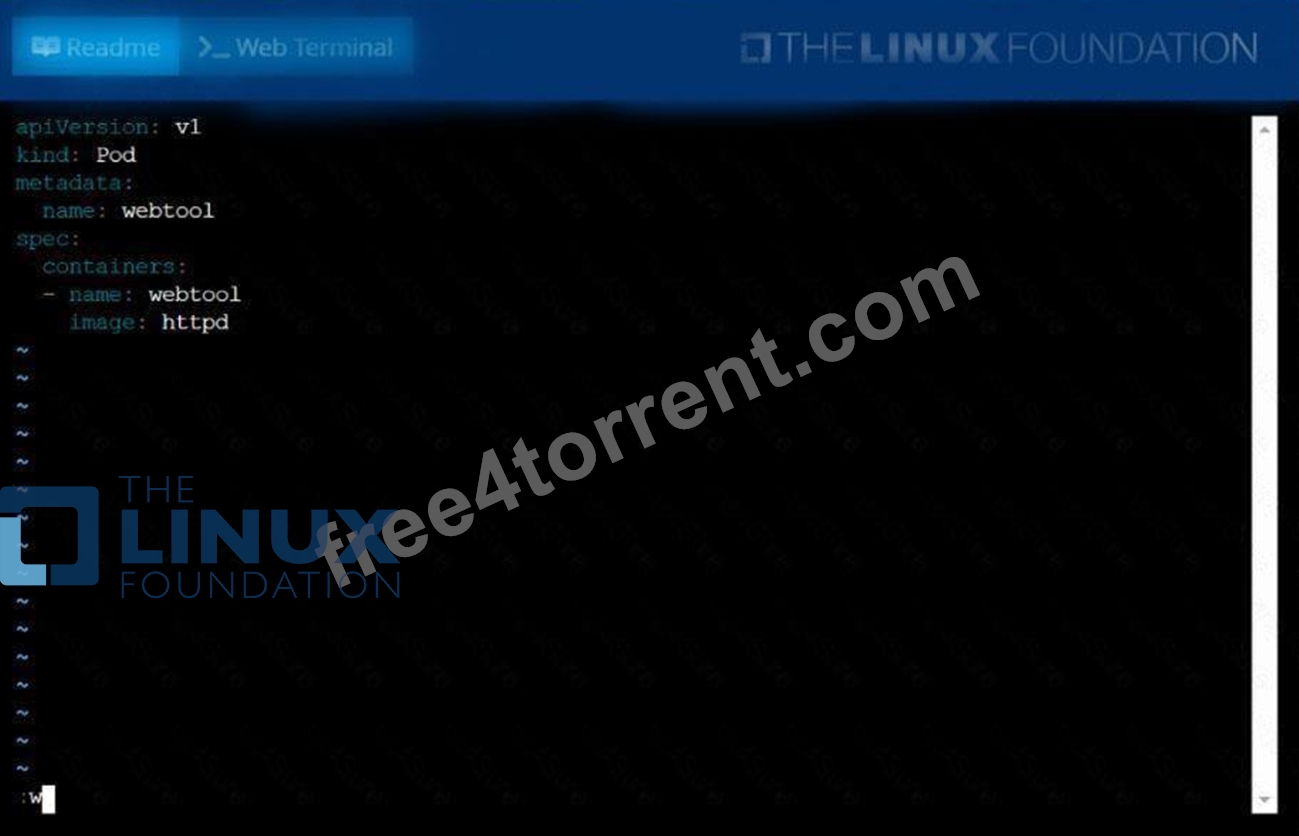
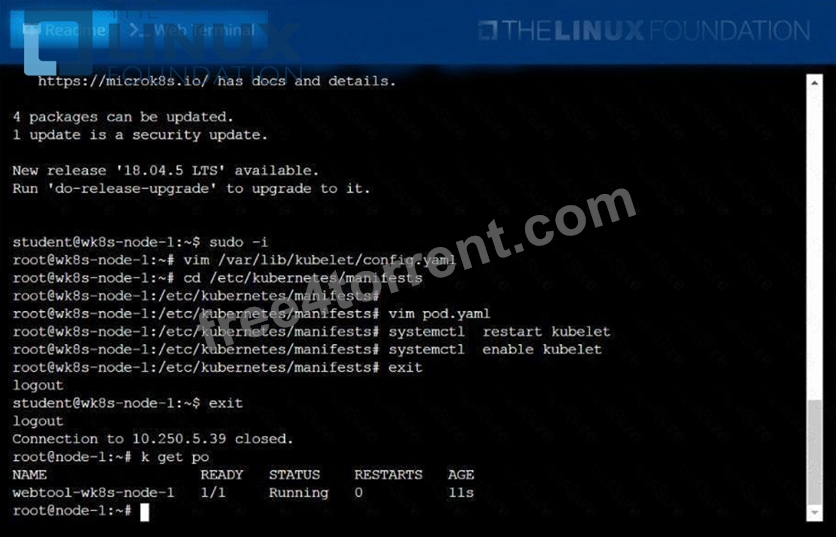
Configure the kubelet systemd-managed service, on the nodelabelled withname=wk8s-node-1, tolaunch a pod containing a singlecontainer of Image automatically. Any spec filesrequired should be placed in the/etc/kubernetes/manifests You canssh to theappropriate node using:
[student@node-1] $ sshwk8s-node-1
You can assume elevatedprivileges on the node with thefollowing command:
[student@wk8s-node-1] $ |sudo -i
Answer:
Explanation:
See the solution below.
Explanation
solution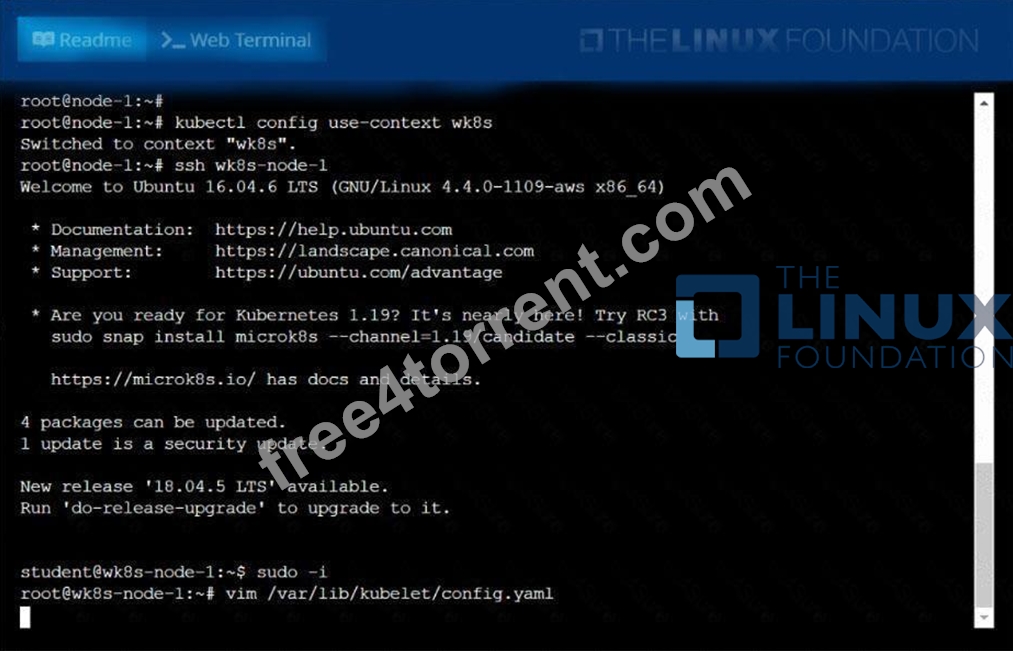
NEW QUESTION # 41
You need to deploy a microservice application that uses a custom DNS service for internal communication between microservices. This DNS service is not a standard Kubernetes DNS service. How would you configure Kubernetes to use your custom DNS service for the internal communication of your application?
Answer:
Explanation:
See the solution below with Step by Step Explanation.
Explanation:
Solution (Step by Step) :
1. Create a ConfigMap for DNS Configuration:
- Create a ConfigMap to store the DNS configuration details for your custom DNS service.
- Example: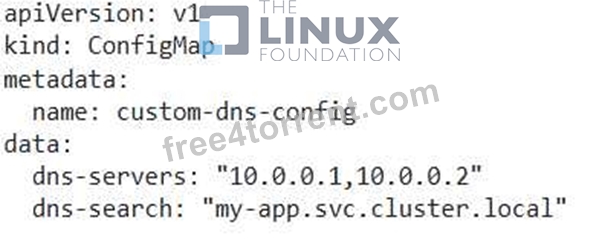
- Replace '10.0.0.1 ,10.0.0.2 with the IP addresses of your custom DNS servers and 'my-app.svc.cluster.local' with the search domain for your application. 2. Create a DaemonSet for DNS Configuration: - Create a DaemonSet that will inject the custom DNS configuration into all pods in your cluster. - Example: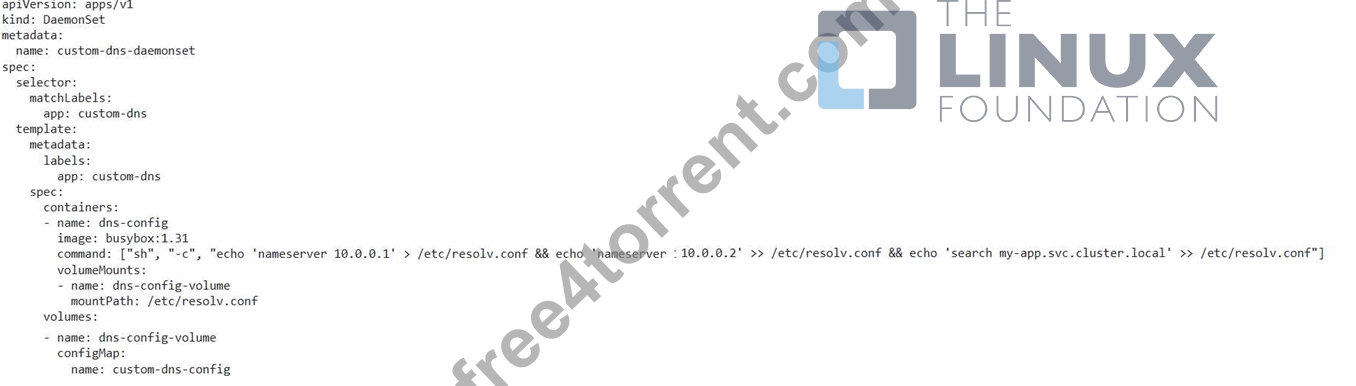
- This DaemonSet will use a 'busybox' container to write the DNS configuration from the 'custom-dns-config' ConfigMap to the '/etc/resolv.conf file in every pod. 3. Deploy your Application: - Deploy your microservice application with the appropriate labels to ensure that the DaemonSet injects the custom DNS configuration into your application's pods. 4. Verify DNS Resolution: - Verify that your application's pods can resolve internal DNS names using your custom DNS service. - Example: - You can use the 'nslookup command within a pod to test DNS resolution. 5. Configure Security: - Implement appropriate security measures to protect your custom DNS service and prevent unauthorized access to your application's internal services. - Example: - Consider using a firewall to restrict access to the custom DNS servers. - Configure access control lists to limit access to the DNS service.
NEW QUESTION # 42
Undo/Rollback deployment to specific revision "1"
- A. // Check Deployment History
kubectl rollout history deployment webapp
kubectl rollout undo deploymet webapp --to-revision=1 - B. // Check Deployment History
kubectl rollout history deployment webapp
//Rollback to particular revision
kubectl rollout undo deploymet webapp --to-revision=1
Answer: B
NEW QUESTION # 43
List all the pods sorted by created timestamp
Answer:
Explanation:
kubect1 get pods--sort-by=.metadata.creationTimestamp
NEW QUESTION # 44
Create a pod named kucc8 with a single app container for each of the
following images running inside (there may be between 1 and 4 images specified):
nginx + redis + memcached.
Answer:
Explanation:
See the solution below.
Explanation
solution
F:\Work\Data Entry Work\Data Entry\20200827\CKA\5 B.JPG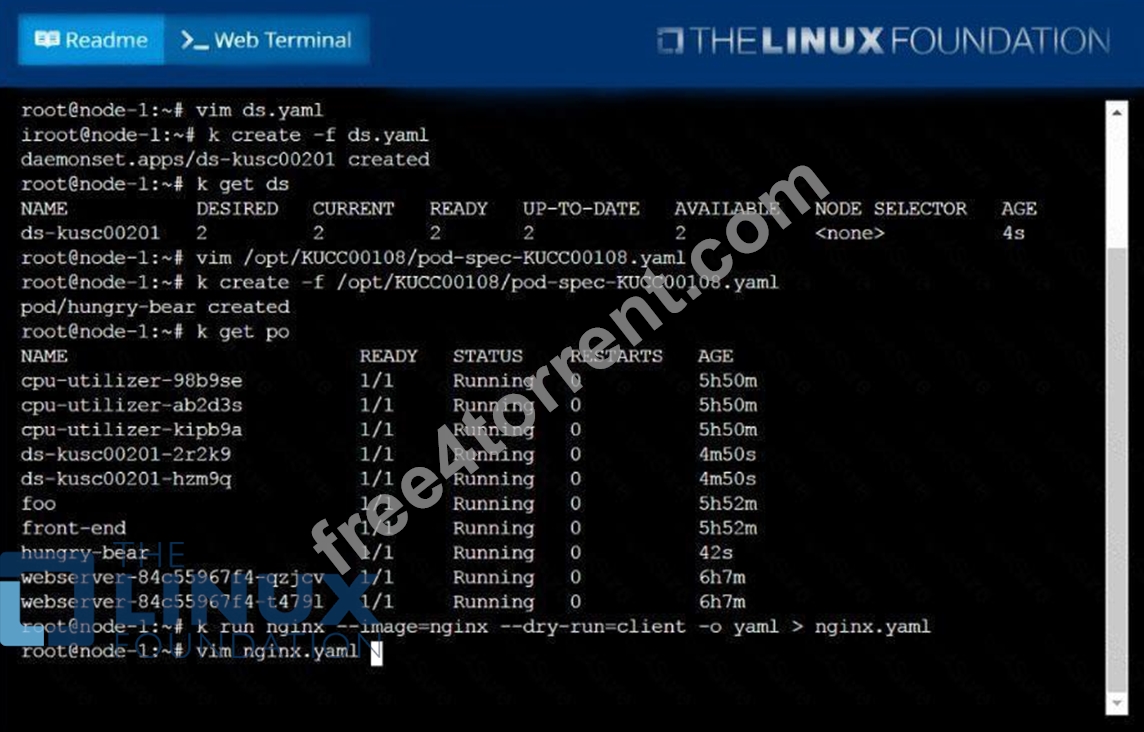
F:\Work\Data Entry Work\Data Entry\20200827\CKA\5 C.JPG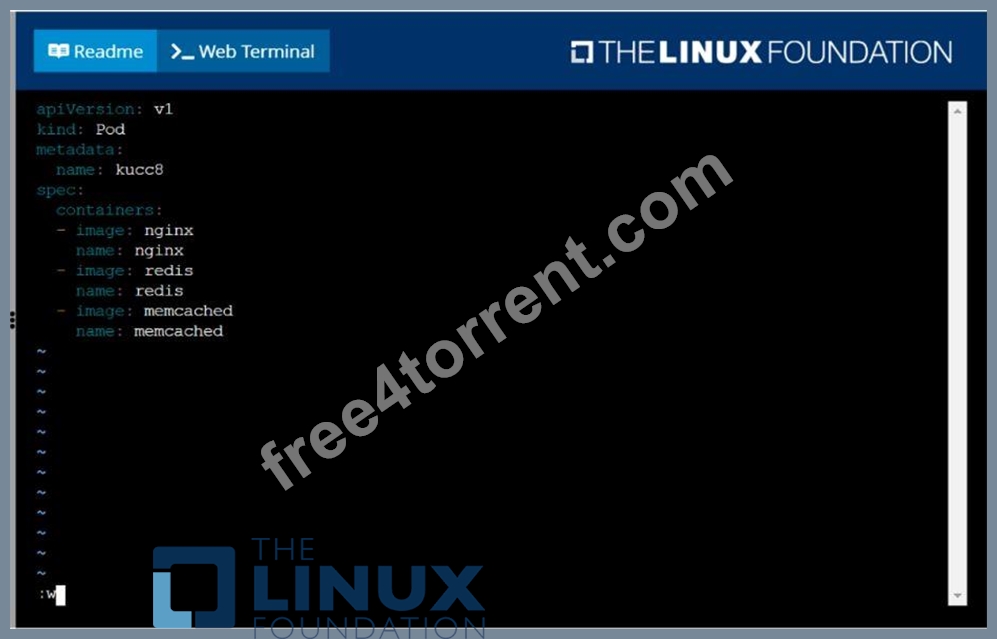
F:\Work\Data Entry Work\Data Entry\20200827\CKA\5 D.JPG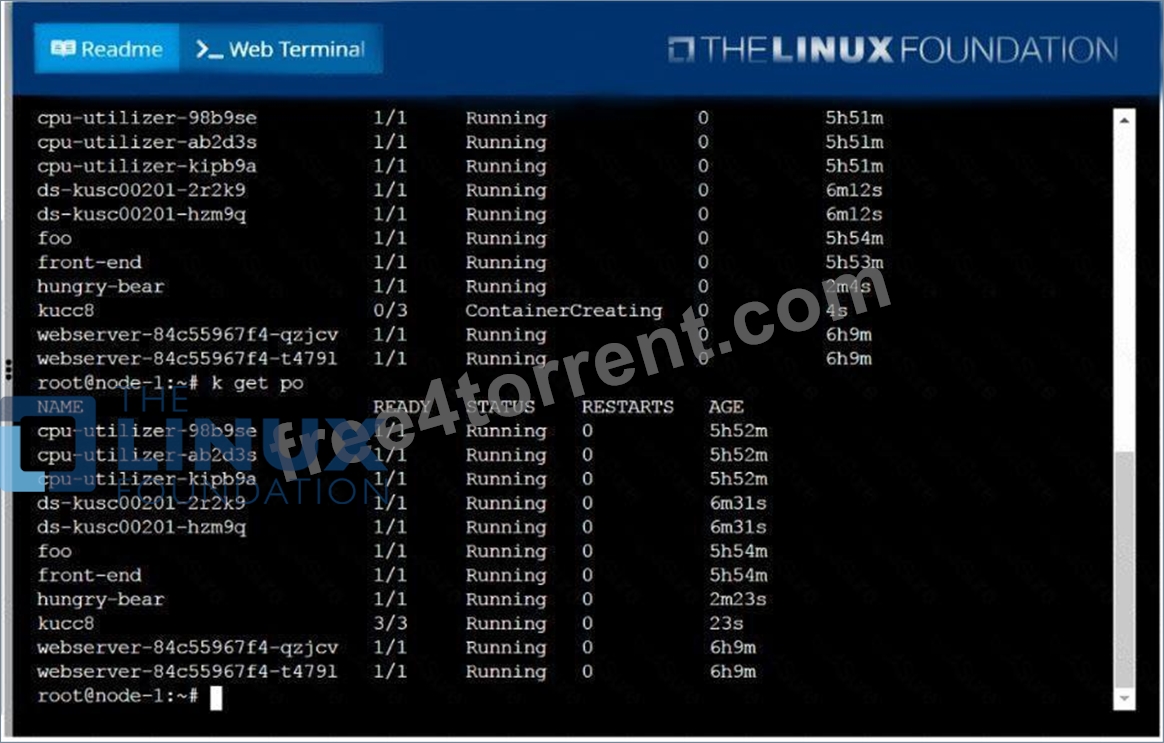
NEW QUESTION # 45
......
CKA certification dumps - Kubernetes Administrator CKA guides - 100% valid: https://validdumps.free4torrent.com/CKA-valid-dumps-torrent.html